How To Add an Image to Your Gmail Signature
An effective email signature conveys essential contact details and adds professionalism to your correspondence. One way to elevate your signature is by incorporating an image, be it your company logo, a personal photo, or a link to your social media profiles. In this guide, we'll walk you through the steps on how to seamlessly add an image to your Gmail signature.
If you're looking for more details on creating sign-offs in Gmail, check out our comprehensive guide on how to add a signature in Gmail.
Why add images to Gmail signatures?
Ever wondered how to add a touch of personality to your Gmail signature? Images like social media badges or personal photos can do wonders! Not convinced? Keep reading, because seasoning your Gmail signature with visuals offers several key benefits.
Reason #1: Social connections
When you combine social media badges with your signatures, you can turn your email contacts into social connections. It's an effortless way to grow your online audience.
Reason #2: Professionalism
Gmail email signatures with brand elements like company logo, or sender photo look so much more professional and personalized.
Reason #3: Visual appeal
Having lots of links in your email footer will simply look messy. Replace lengthy lists with visual badges or buttons, keeping your signature clean and visually appealing.
Ready to unleash the power of images in Gmail signatures? Let's dive into the how-to!
Step-by-step guide on how to add an image to Gmail signature
Upgrade your Gmail with images in minutes!
Adding images is easier than you think! We have prepared a small guide and several ways to add images to your Gmail in less than ten minutes.
How can I add an image to my Gmail signature?
Step #1: Log in to your Gmail account and click on the small gear icon in the top right corner.

Step #2: From the drop-down menu, select ‘See all settings’ to access the comprehensive settings panel. Within the settings panel, click on the ‘General’ tab, and scroll down to the ‘Signature’ section.
Enable the signature feature by clicking the radio button, and then choose ‘Create new’ to start configuring a new signature.
.png?1705320524)
Step #3: Add Image.
Choose where you want your image to shine in your signature.
Option 1: Click ‘Insert image’ and pick your preferred method
Now let's take a look at several ways to add an image to an email signature in Gmail:
1. Click the ‘Insert Image’ icon.
.png?1705320625)
The window with 3 options will popups:
a) My Drive. Select an image already saved in your Google Drive.

b) Import process. Choose a new image from your computer.

c) Web Address (URL). Insert an image directly from your website (like your logo).

Option 2: Use copy and paste method
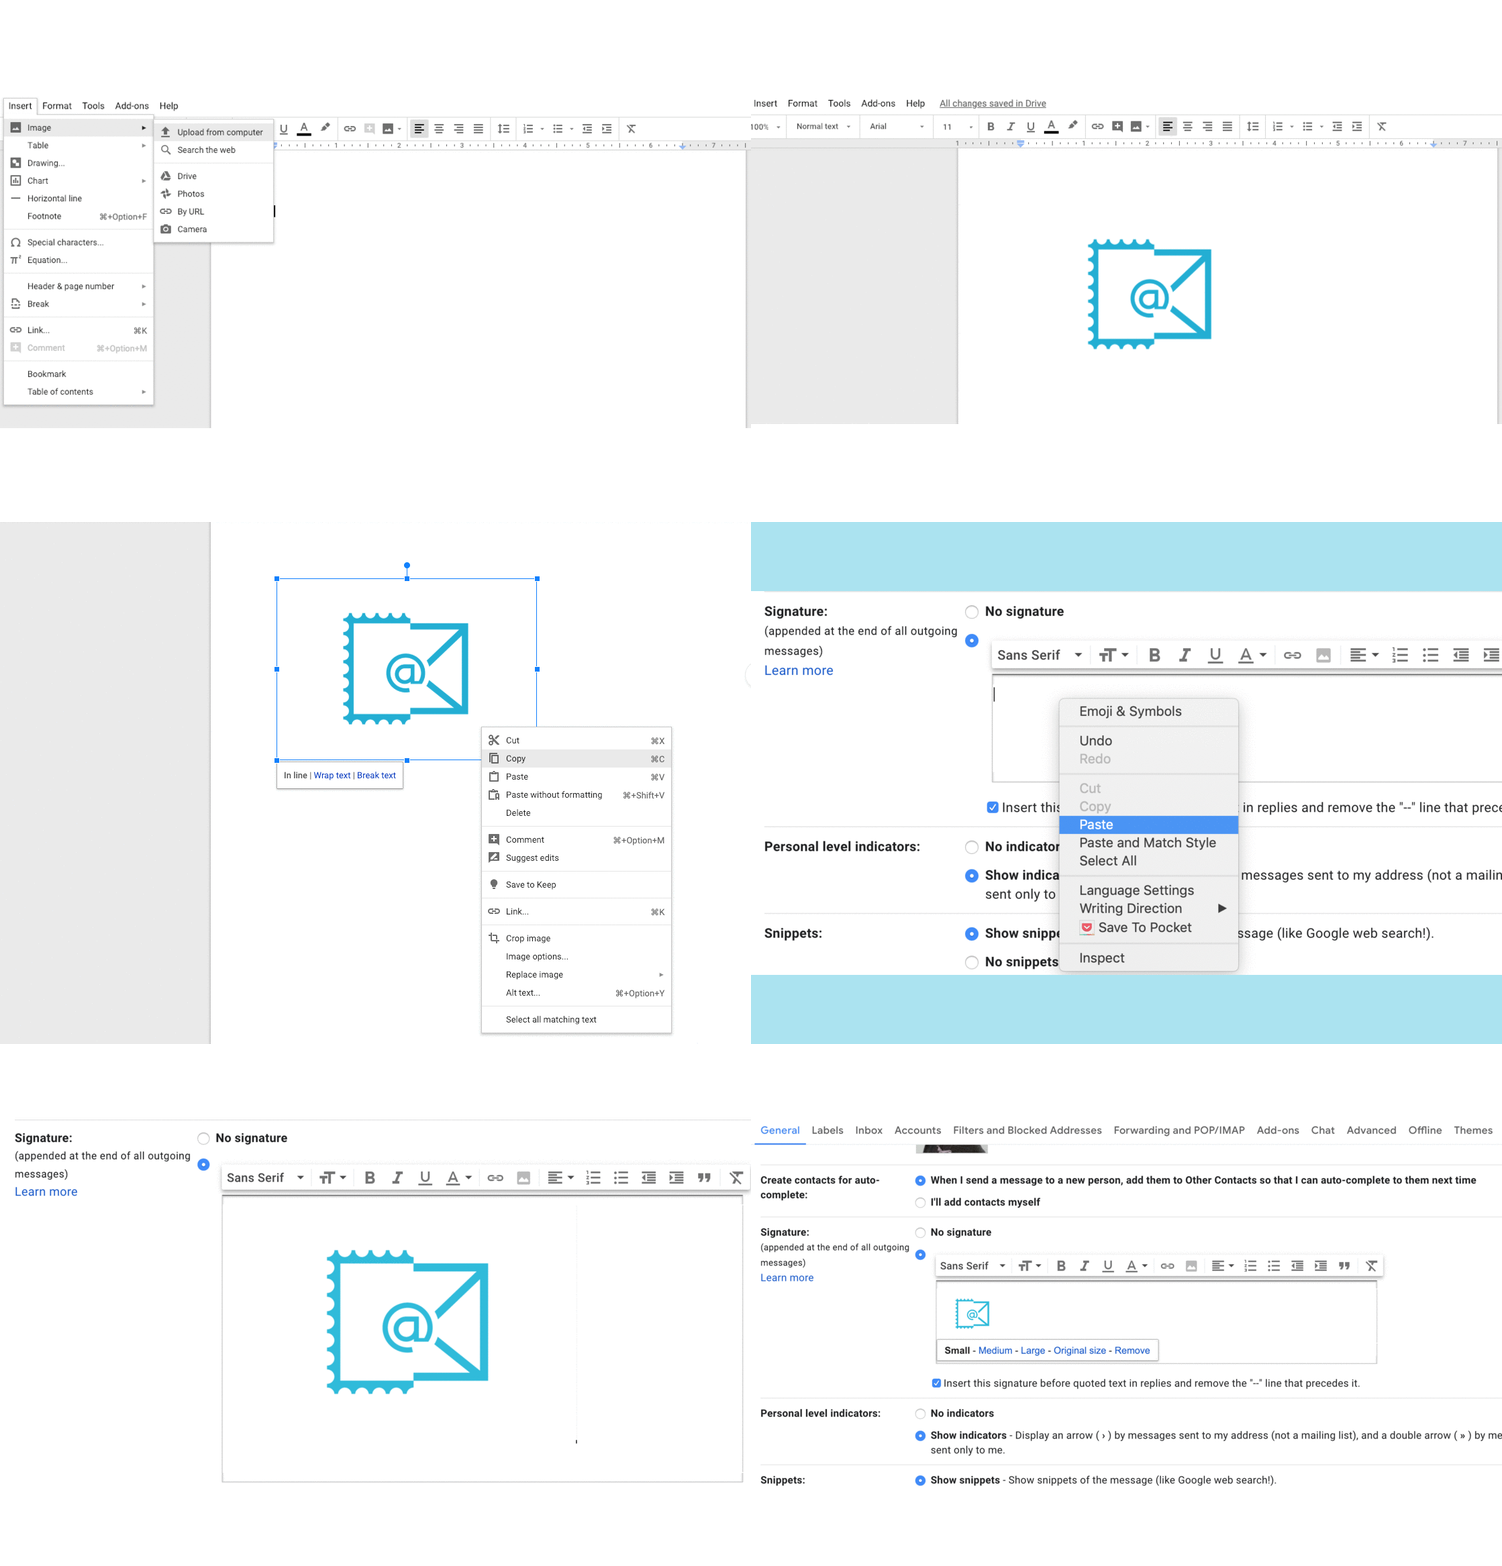
Prefer a drag-and-drop approach? Insert your image into a Google Doc, then simply copy and paste it into your Gmail signature block. No upload fuss is required!

Troubleshooting
1. The image doesn't show up in the signature.
Make sure you've turned on sharing settings in Google Drive
2. The image goes as an attachment.
Uploading directly to the signature block can make it appear as an attachment in some email clients. Consider hosting on Google Drive or an external server instead.
3. I don't have ‘My Drive’ and ‘Upload options’.
If you don't have ‘My Drive’ and ‘Upload options’ options, contact your Google Workspace Admin to enable external sharing in the Google Admin Console. This lets you add images hosted on a public web link to your signature.
Alternatively, clear cookies and cache or use an Incognito window if you're signed into multiple accounts.
4. How do I add an image to the hosting service?
Upload your photo or company logo to some image hosting services like Postimages, imgbox, or any other. For this session, we’ll make use of Postimages.
Click on ‘Choose images’ to select the image you want.
.png?1705320916) After the image has been uploaded, right-click on it and select ‘Copy Image’.
After the image has been uploaded, right-click on it and select ‘Copy Image’.
.png?1705320965) Go back to your Gmail account and add a picture (Ctrl + V for Windows; Command+V to do the same on your Mac).
Go back to your Gmail account and add a picture (Ctrl + V for Windows; Command+V to do the same on your Mac).
.png?1705321020)
Boost your reach with social badges in your signature
Adding eye-catching social badges is a simple way to boost your online presence and connect with recipients on a deeper level. Here's how to get started:
Step#1: Finding badges.
Head to iconfinder.com for a vast library of free badges from popular platforms like Facebook, Twitter, and beyond.
Step #2: Choosing the right size.
Just select the size that works best for your Gmail signature and download it! For optimal viewing on different devices (especially mobiles), stick to smaller sizes like 32x32 pixels. Bigger than 48x48 might get blurry on smaller screens.
.png?1705321163) Step #3: Adding the image to your email signature.
Step #3: Adding the image to your email signature.
Open your Gmail settings and navigate to the Signature section. Click ‘Insert image’ and select ‘Upload’ to add the image. Position the badge where you want it in the editor.
.png?1705321211)
Step #4: Adding a hyperlinked image.
Keep in mind, that it’s only an image that isn’t linked to any of your profiles!
If you want direct clicks to your social media profiles, copy the URL of your desired page. Select the badge image in the editor and click the ‘Link’ button.
Paste the copied URL and click ‘OK’ to create a hyperlinked image.
.png?1705321276)
Step #5: Click ‘Save Changes’.
Scroll down to the bottom of the page and click ‘Save Changes’ to ensure your new signature is applied to your outgoing emails.
Step #6. Testing your signature.
To ensure your signature looks as intended, compose a new email and review how it appears. Test across different email clients and browsers to guarantee compatibility and consistent display.
Optimize your Gmail signature image sizes
The image size depends on how wide the rest of your email footer is, and how it will fit into your existing layout. However, we recommend following a few rules when creating your Gmail signature.
Banner
Keep it compact. Aim for a width of 600 pixels or less to avoid overflowing into recipient emails.
Logo/photo
The optimal size for logos and photos is between 100-300 pixels wide.
Social icons
As we already mentioned earlier, it is best to use 32×32 or 48×48 px social media buttons for a clean, clickable touch.
Curious about the best format for email signature? Newoldstamp offers valuable insights in this article.
File size matters too
Original size isn't always best when it comes to email signatures. Large images can get swallowed by email clients or hit size restrictions, leaving your carefully crafted footer hidden from some recipients. To avoid this frustration, keep your signature images under 50kb.
Pro Tip: Consider using an email signature management tool like Newoldstamp for effortless image resizing and optimization. Plus, tools like Picsart can enhance your image quality without adding bulk.
Note: Explore our free email signature generator for a simple yet visually appealing email signature.
Some tasks are outside of your knowledge base, and others are simply too time-consuming. So if you believe that time is your most valuable resource and you don't want to waste it, bear in mind that delegating certain tasks or using advanced apps/services can be a savings tool rather than an expense.
How Newoldstamp makes adding images to your Gmail signature a breeze
Newoldstamp is an email signature generator that has all you need to create professional signatures for Gmail and other email clients.
Browse our extensive template gallery and choose a layout that resonates with your brand. Customize everything from colors and fonts to field order and social icon styles.
.png?1705321603)
Why choose Newoldstamp?
1. Upload any image, no need to pre-resize or crop. Adjust the shape, size, and cropping directly within Newoldstamp's intuitive email signature editor.
2. No need to worry about blurry images. Newoldstamp supports retina and 4k displays.
3. Effortless image placement. All you need to do is choose the template you like. And voila! Your picture finds its perfect spot.
4. Social media made easy. Access over 150 pre-designed social media badges - no searching or editing required!
.png?1705321665)
5. No attachments, just clean email messages. Newoldstamp hosts your images, keeping your inbox clutter-free.
6. Turn images into links. Hyperlink your visuals to drive engagement and direct traffic to your desired destinations.
Note: Explore email signature examples for inspiration.
It's that simple! Newoldstamp empowers you to create impactful signatures without technical expertise. No coding, no tech teams, no third-party headaches.
Just you, your brand, and a signature that makes a lasting impression.
Here's a quick comparison to illustrate the ease of use:


