
How Do I Create a Signature in Apple Mail?
Are you an Apple Mail user? Get the most out of your inbox capacity! Here are some guidelines for you to effortlessly set up an Apple mail signature.
You won’t exaggerate if you think that the majority of active Mac and iPhone customers are using Apple email accounts. The latest statistics show that iPhone users take over 28% of the email client market share. However, only 8% are utilizing the Apple Mail app on their laptops.
It is an excellent example of the shift to smartphone over computer usage, which has been drastic during the last few years. As iPhones become the primary tool for communication, using a free iPhone cleaner can help ensure optimal device performance. However customer needs are changing together with digitalization, and businesses should respond accordingly. That is why you need to feel confident in utilizing your Apple email client. Below, you can find out how to add a signature in Mac Mail.

Create an Email Signature in Apple Mail on Your Mac
1. Open the Apple Mail application, move the mouse over ‘Mail’ in the top menu and select ‘Preferences’.
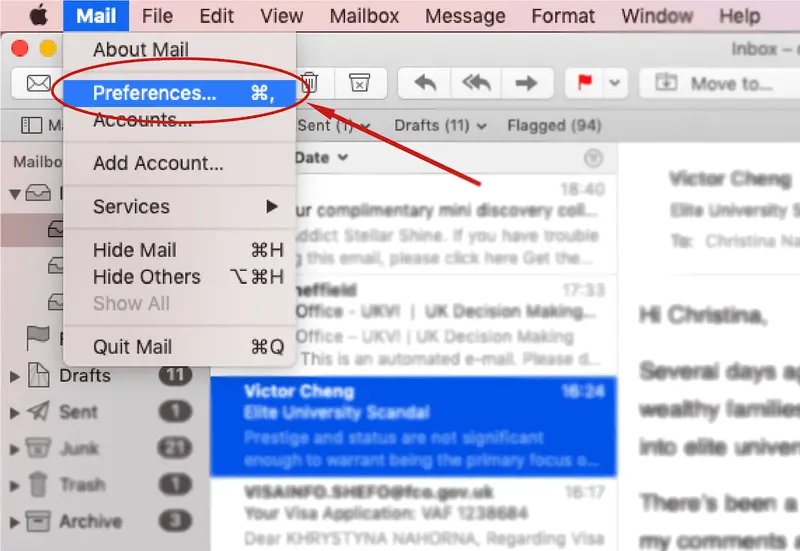
2. In the opened pop-up window, go to the ‘Signatures’ tab and choose the account you wish to create the signature in. Click on the '+' button to create one.
3. You can change the name for the signature in the middle column. There is an editing space in the right column where you can design your signature or insert an externally generated one.

4. Email signatures in Apple Mail can be formatted in a custom way. Change the font colors, style and size, insert links and add images:
- Click on ‘Format’ in the top menu to open ‘Fonts’ and ‘Colors’ settings.
- Click on ‘Edit’ and select the relevant option to check the spelling of the text or add symbols.
- Add an image by just dragging it to the signature editing space.

5. If you have designed an Apple email signature in an external generator, just copy it from the dashboard of your service and insert it into the right column.
Read more: "The 9 Best Email Signature Generators in 2025"
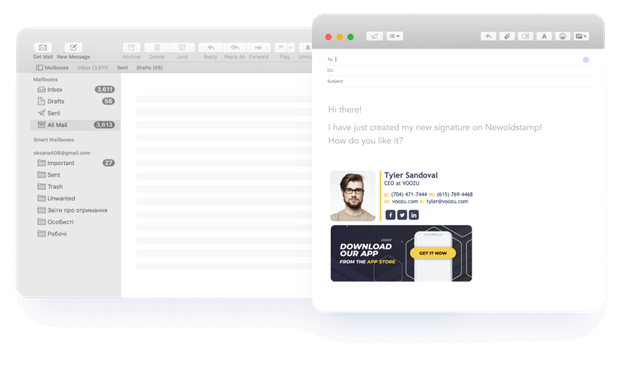
If you wonder how to add a signature in Mail Mac, we recommend using Newoldstamp as an advanced solution for generating signatures for Apple Mail. It is convenient to handle and provides a variety of assets to make your Mac Mail signature more appealing and interactive. Just follow the simple video guide to start getting the benefits of this trendy marketing tool for your business. And remember to use either Google Chrome or Mozilla Firefox browser when you copy and insert the signature.
Pros and Cons of creating an email signature in Apple Mail
Pros
- An opportunity to edit the Mac email signature style, and add images and links.
Cons
- You won’t be able to add social icons to your signature in the Apple Mail application.
- The colors, fonts, symbols, and other editing options are all over the place and not integrated into one window.
Create an Email Signature in Apple Mail App on your iPhone or iPad
To be fair, the easiest way to install an email signature on your iPhone is to send it to yourself from the computer. However, if you wonder how to add an email signature on Mac without any additional assets, or contact information, please follow a few steps to add a signature to Mac Mail:
1. Open the ‘Settings’ app on your phone and scroll down the menu to select ‘Mail’.
2. Find the ‘Signature’ option at the bottom of the page, in the opened section, insert the desired signature.
3. Although, there are some basic styles available for the signature text; you can bold, italicize, or make it underlined. Tap and hold a finger on the content, then select a relevant bit, and from the pop-up menu choose ‘BIU’ to format the signature.
Of course, it’s not an ideal decision of how to add a signature in the mail on Mac, but we have what we have.
Note, that if you have several accounts linked to your Mail, you can create a different signature for each one of them. Following the same process as described above, in the ‘Signature’ section tick ‘Per Account’ choice and open the relevant box to insert the Mac mail signature.

Pros and Cons of creating an email signature in the Apple Mail app on your iPhone or iPad
Pros
- You can keep it concise and straightforward.
Cons
- You can’t format the signature style.
Features to complement an email signature created in Apple Mail
- Set up a Mac Mail signature to be added automatically to your new messages, select the account, and specify the signature (if you have more than one). At the bottom of the pop-up window, click on the ‘Choose signature’ drop-down list and pick ‘At random’ or ‘In Sequential Order’ as your most suitable option.
- Double-check the links you are adding to your Apple Mail signature because Apple Mail doesn't validate them.
- Whenever you write a reply to the email, it usually includes the quoted text of that message. The ‘Place signature above quoted text’ option allows you to place your signature above that quoted message. Untick the choice if you want it to appear at the very bottom of a reply.
- You may face some difficulties resizing a picture in your email box. We suggest you change it to the correct size before inserting it in the signature. This can be done by using the ‘Preview’ application on your Mac or any other photo editor. The standard image width is 150-200 pixels.
- With the Mac email signature created in the Newoldstamp editor, you can send the link to yourself with only one click, which is a fantastic option if you want to use the same signature on your mobile. Just open the message on your iPhone inbox and install it in the settings the usual way. Now you know how to create a signature in Apple Mail.

Enhance your Apple Mail experience with these tips
Streamline your email workflow and personalize your communication with these Apple Mail tips.
Set up a smart mailbox to categorize your messages
Apple Mail's smart mailbox feature lets you automatically categorize emails based on specific criteria. Consider creating a smart mailbox for emails requiring signatures. This way, you can easily identify these emails and quickly add your signature before sending them.
In the Apple Email application, you have two types of folders. They are regular folders in which you can select and manually drag emails. And smart folders (mailboxes) that filter and collect emails based on rules you set up.
Here's how to set up a smart mailbox:
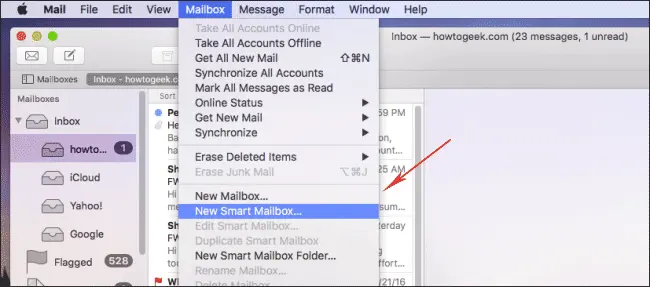
- Go to the Menu bar and click ‘Mailbox’ -> ‘New Smart Mailbox.’
- Define your filter criteria. You can base your mailbox on the subject, the recipient, the date received, etc.
Save time with group lists
If you need to send an email to a group of specific recipients, you can manually copy and paste the entire list of addresses, which is inefficient. Instead, you can use the built-in Contacts program with your Mac.
- Go to ‘File’ at the top-left and select the second option which is ‘New Group.’
- Call it whatever you want and go back to ‘All Contacts.’
- Then drag and drop the recipients into the new group you’ve just created.
- Now open the email program, create a new message, type the name of your group in the “To” field, hit the comma and you'll see all those people's email addresses.
Now, whenever you need to send a signed email to your colleagues or clients, you can quickly select the group list and add your signature with ease.
Create email templates in the Mail Application
If you need to write the same email message over and over again, save it as a template for later use.
Here's how to create a template:
- With Mail open, go to create a new message. And what you type in this message is going to become your template.
- Once you have everything filled out, go to ‘File’ -> ‘Save as Stationery.’
- Then give it a descriptive name like “My Apple Mail Template” or something like that.
- Next time just start a new message and look for the Stationery icon in the upper right corner, click on that to see the list of folders. Look for the folder called “Custom.” There you’ll find the template you saved.
Similar to saving a template as "Stationery," you can create a new email with your desired signature text and format it to your liking. Now, whenever you need a signature, simply open a new email and select your signature template from the Stationery menu.
Craft a professional HTML signature
Consider using Newoldstamp to design a visually appealing signature. This service offers a user-friendly interface and templates, allowing you to create a signature for email even without coding knowledge.
Avoid Safari for signature editing
When using a signature creation service, avoid opening the signature file with Safari to prevent formatting issues. Use Google Chrome or Firefox instead.
Summary
An email signature is one of those digital marketing techniques that are applicable to achieve various objectives. Whether it’s attracting new subscribers to your blog or enhancing your brand recognition, you will benefit from having a good signature in place.
There are some obvious limitations to adding and editing an Apple Mail signature. It takes quite an effort to add a signature to Apple Mail and make it appealing and useful considering its poor potential on iPhones. However, it may be a good option for those not looking for extra details. Generally, the email signature works best on your Mac Mail. Thus, investing time in setting up your email signature on this platform can yield significant benefits aligned with your objectives.

