How to add a signature to CanaryMail
CanaryMail is one of the best email clients highly appreciated by Mac users. Let`s face it if you are reading this article; you are one of these dedicated users who are happy about the functionality and opportunities it provides.

source: Canarymail
As a modern and progressive email client, Canary allows you to include a custom signature with each outgoing message. It has never been easier to create a new email signature for CanaryMail and take advantage of all the benefits it can provide.
Once you are well determined to add an email signature to your emails, follow the simple steps described below to carry out the installation process just in a few cliсks.
Step 1
Open CanaryMail client for Mac.
Step 2
Select ‘ Canary’ from the top menu. Then select ‘Preferences’ from the drop-down list.
Step 3
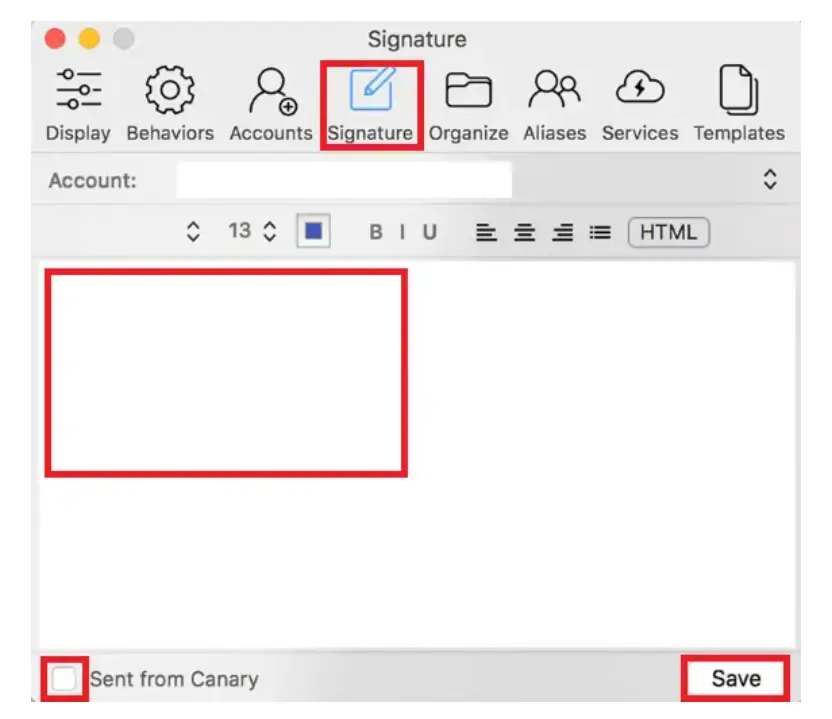
Opening the ‘Preferences’ window, you will see tabs listed across the top. Select the ‘Signature’ tab.
Step 4
The ‘Signature’ tab opens up as a large blank box where you insert your email signature. You can add a plain text email signature, or paste your premade HMTL signature into the field.
If you have a Newoldstamp email signature generator account, log in, select, or create a signature:
- Press the button `Create Signature.`
- Fill in the necessary information and contact details
- Choose the font style and size
- Upload your company logo or personal photo
- Add social network links
- Upload a promo banner or choose from the available presets
- Press ‘Save and proceed.’
When you are done creating a new email signature, press `Use` and easily copy your HTML signature.
Step 5
Now that you have copied your email signature go back to CanaryMail and paste it into the ‘Signature’ window.
Step 6
With your signature pasted, untick the Sent from Canary check box at the bottom left of the signature window.
Step 7
Well done. Click ‘Save,’ close out of your preferences. From now on, your email signature will be automatically added to all of your outgoing email messages. It would be good to compose a new letter and send it yourself to check whether everything works fine.

*Note sometimes the social media icons appear to be not clickable
In most cases, checking if your social media links work well is impossible in the compose mode. The matter is social media icons in the email signature become clickable only after it is sent. Therefore, it is recommended to send a test email to yourself and make sure you can click on social media icons in the received email message.
Having spent just a few minutes of your time, you will have a personalized email signature automatically attached to all your messages. Hopefully, this guide will lead you through the procedure, and you will feel nothing but the benefits of a well-designed email signature.


