Mac Outlook Signature: Seamless Signature Setup
1. Create an email signature in Outlook for Mac
2. How to add a signature in Outlook Mac
3. How to change the signature in Outlook on Mac
4. Editing and managing signatures in Outlook Mac
5. Managing multiple signatures in Outlook for Mac
6. How to automatically include a signature in Outlook
Adding an email signature to Microsoft Outlook is simple if you’re using a Mac. You can access your email client from the browser or the Outlook Mac app, which will allow you to add a Mac Outlook signature and showcase your brand in just a few steps.
Let’s look at how to add a signature in Outlook Mac below.
Create an email signature in Outlook for Mac
The process of adding an email signature in Outlook Mac is simple. But you will first need to design the signature and ensure that it reflects your brand and is professional.
When you add a signature in Outlook Mac, it will become an integral part of every email communication you have. That means it needs to contain the correct information, be instantly recognizable, and carry a professional image you want to nurture in the eyes of your customers and partners.
The good news is that you don’t have to worry about putting together a professional-looking Outlook for Mac signature on your own.
If you utilize an online email signature generator, like Newoldstamp, you can take advantage of an intuitive interface, countless professionally designed templates, and a simple process that allows you to input the information and insert your signature in minutes.
These templates will enhance your Outlook signature on Mac, making it easy to add your contact details, branding elements such as logos, and even promotional materials like banners.
How to add a signature in Outlook Mac
If you want to figure out how to add a signature in Outlook on Mac, you can follow a simple process that will allow you to complete the steps in just a few minutes.
- In the Outlook menu, click Preferences and find the Signatures section under Email.
_(1).png?1703802777)
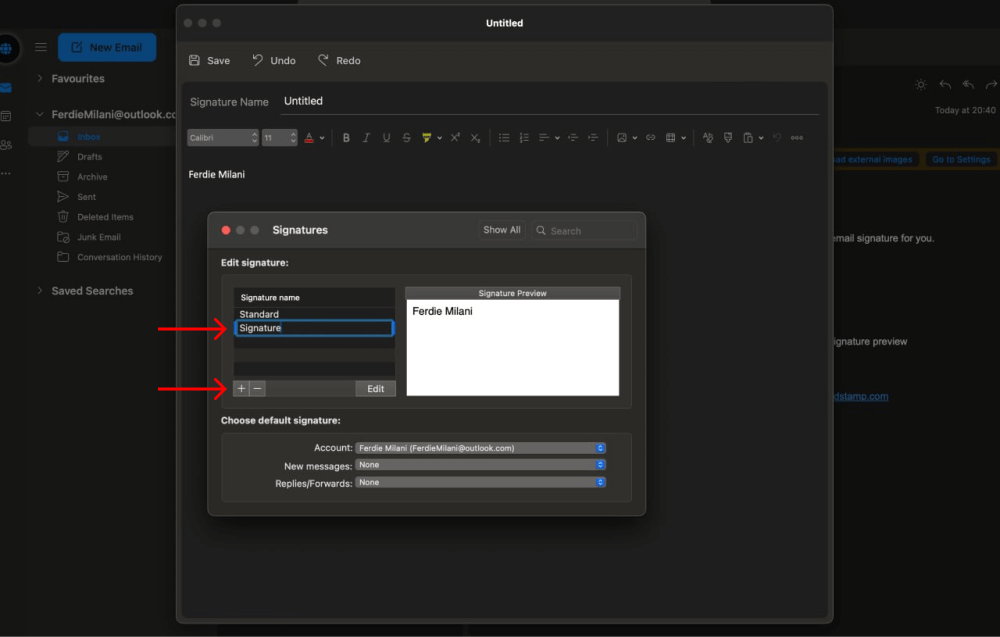
- Select the + icon to add a new signature and type in its name.
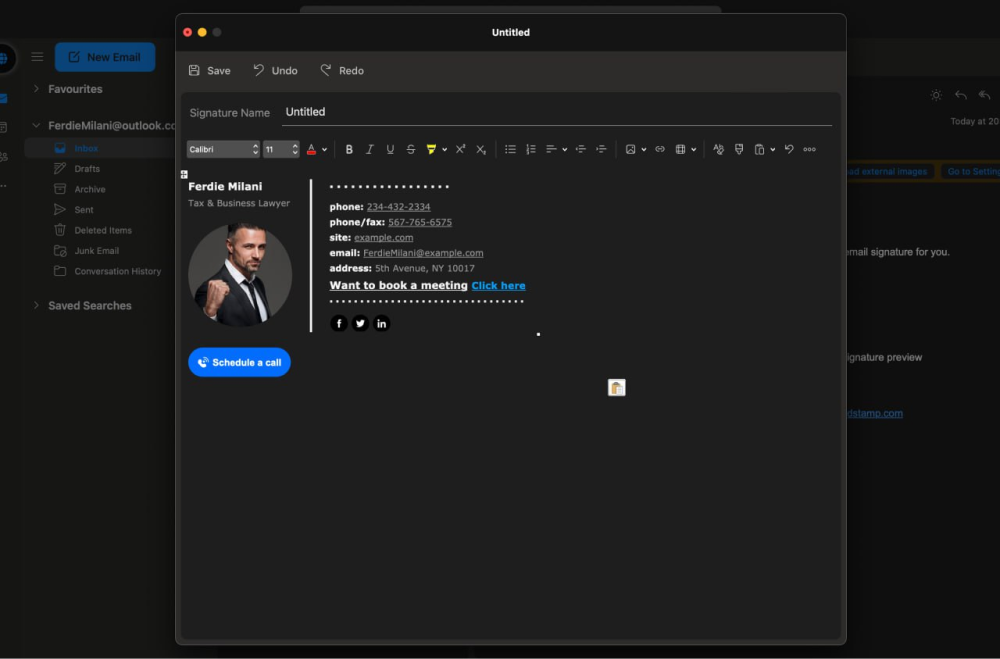
- Paste your signature or create it from scratch using the tools available in the signature box.
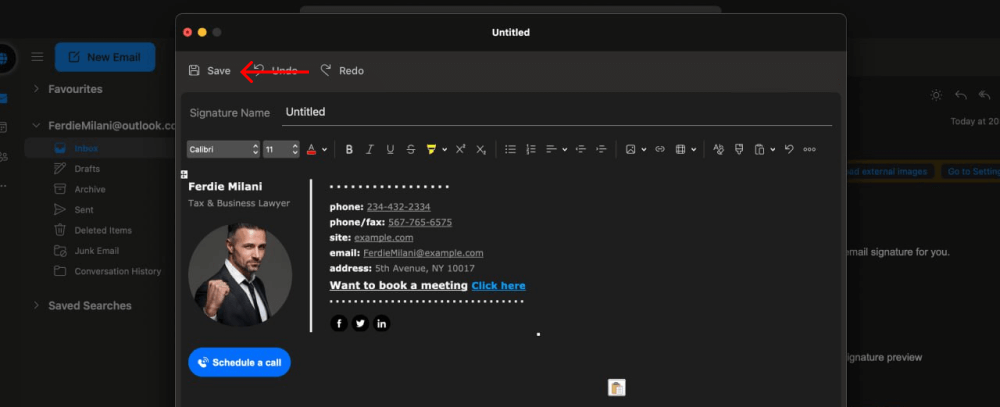
- Once finished, click Save and close the editor window.
How to add signatures to new emails and replies/forwards
Once your signature is created in the signature editor, the final step is to include the Outlook Mac signature in every new email, as well as the replies and forwarded messages.
Here’s a simple process for doing that:
- Click Preferences and head to the Signatures section under Email.
_(1).png?1703802777)
- Once there, find the bottom section of the box, where you’ll be able to choose the default signature.
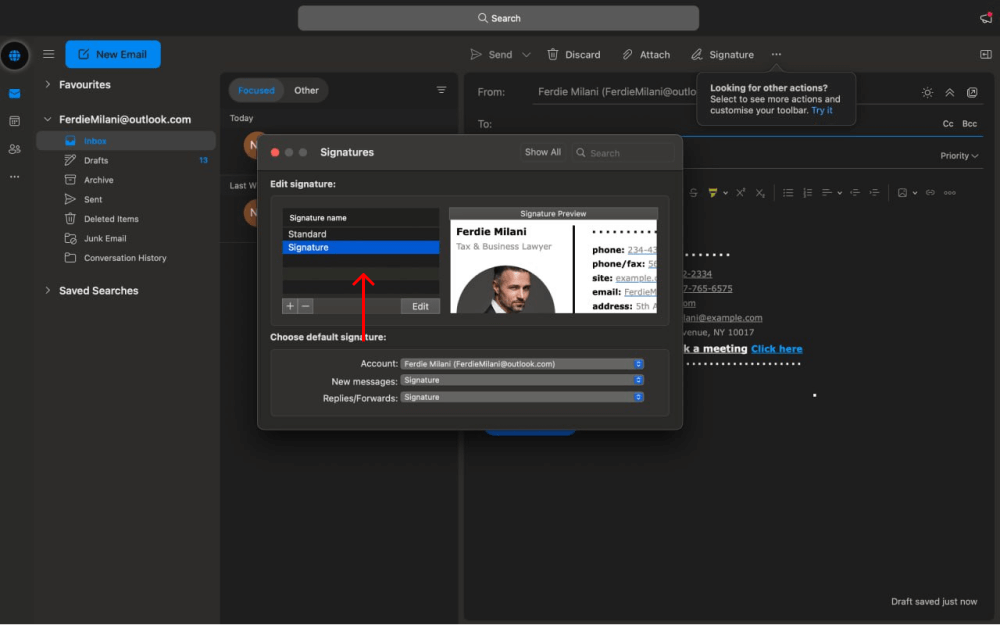
- Select the signature template you created for new messages and replies/forwards.
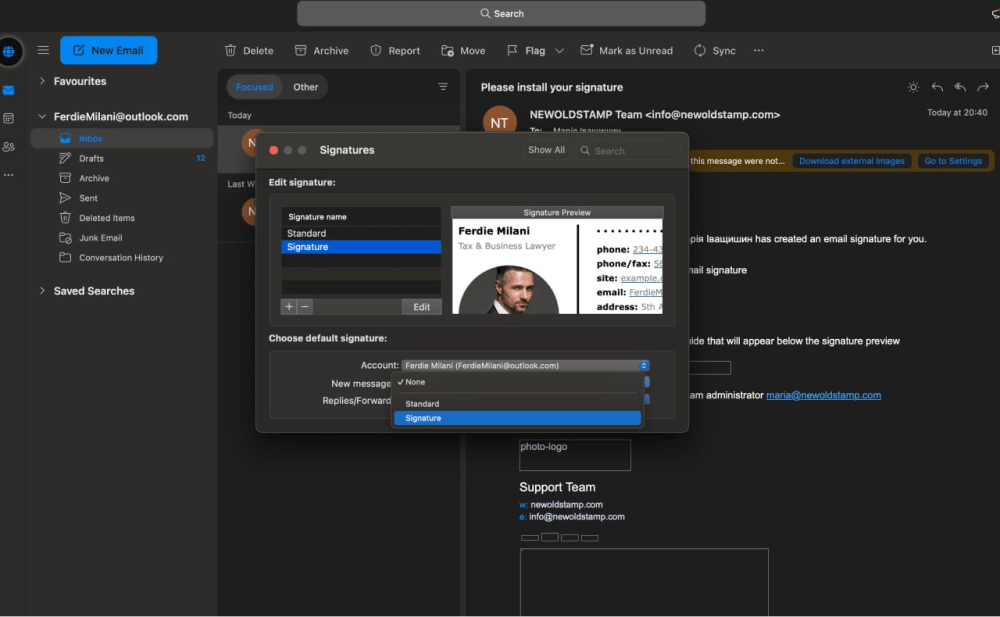
- Now, the new signature will appear at the end of every email you send automatically, without you having to add it manually.

How to change the signature in Outlook on Mac
An email signature is only as useful as it is accurate and relevant. And when that’s no longer the case, you need to be able to change the signature in a way that accurately reflects the company, brand, and role you represent.
For example, if you switch jobs or get a new job title, you'll need to change your email signature. Switching jobs means the entire signature needs to be redesigned from scratch, as it will require different branding, contact details, and other relevant information.
Other times, you may need a different type of signature based on the person you’re emailing and the purpose of the message. Since email signatures are such a key part of branding and marketing, knowing how to change the signature in Outlook Mac is a necessary skill for people with Outlook accounts.
So, how can you change the signature in Outlook Mac? Here’s a simple process you can follow if you want to edit a signature in Outlook Mac.
- Head to preferences > Email > Signatures.
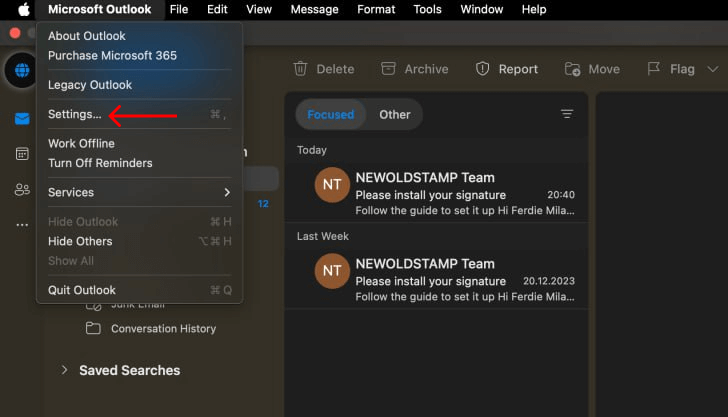
- Press the + icon to create a new signature.
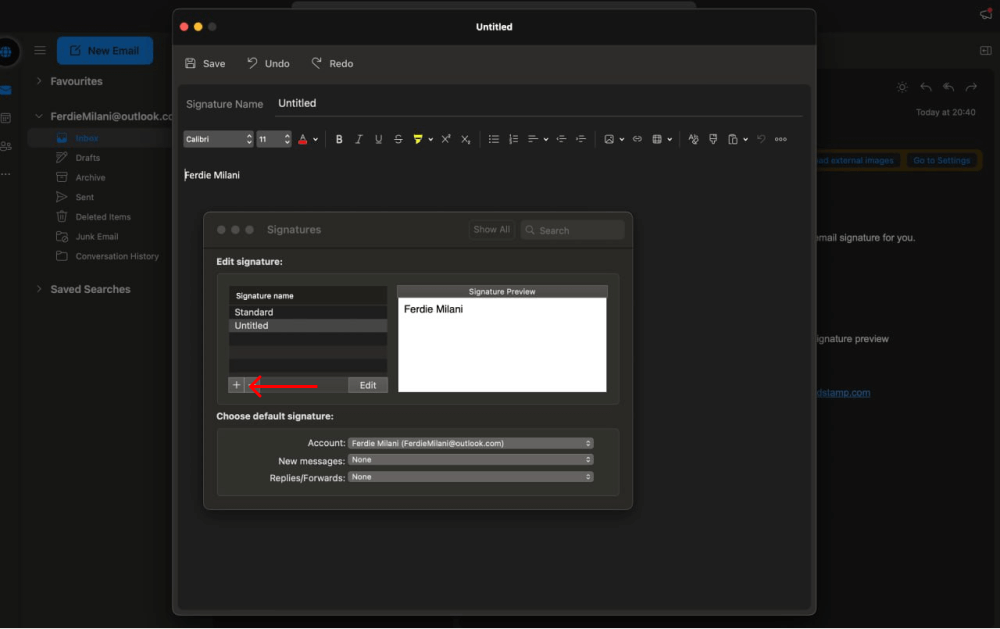
- Once you paste or create your signature, click Save.

- At the bottom of the Signatures section, select the new template to be used automatically in new messages and replies/forwards.
_(1).png?1703803476)
Editing and managing signatures in Outlook Mac
If you don’t want to completely overhaul your signature but need to update the details, it doesn’t make sense to create a new Outlook email signature. Instead, you can make changes to the signatures that already exist, editing the parts that you would like to be more relevant.
To change how your signature looks, follow this process:
- Go to Preferences > Email > Signatures.
_(1).png?1703802777)
- Find the signature template you want to change and select it.
_(1).png?1703803549)
- Make the changes you want and click save.

- If you already had it as the default signature template, that’s it. If not, make it the default signature for new messages and replies/forwards at the bottom of the Signatures section.
Managing multiple signatures in Outlook for Mac
Having an informative email signature can make a huge difference in your branding and marketing. But for best results, you may want to consider using multiple signatures that you can add to an email based on the recipient and circumstances.
Here’s why should you have multiple signatures:
- More personalization. Your email recipients are different, so it makes sense to have different signatures that highlight different information for a more personalized and engaging experience.
- Promote multiple offers. Newoldstamp makes it easy to add banners and CTAs to your emails. By having multiple signatures, you could showcase different offers to maximize the likelihood of click-throughs and conversions.
- Track campaign performance. Having multiple signatures and multiple offers will also allow you to track performance. By setting up click tracking, you can discover which offers and links resonate with your audience, using that data to optimize your signatures and marketing.
So, how can you add more signatures in Outlook Mac? Here’s a step-by-step process:
- Go to Preferences > Mail > Signatures.
- Press the + icon to create a new signature.
- Once you paste it or create it from scratch, click Save.
- At this point, you can choose the signature you want to send with each message from your templates menu.
How to automatically include a signature in Outlook
If you don’t want to add a signature in Outlook Mac manually every time, it’s easy to set up an automatic process that will insert the signature at the end of every email automatically.
- Go to Preferences and choose Signatures in the Mail section.
- There, you will need to configure the default signature settings to ensure that the signature is included in every email you send and reply to.
- To achieve that, you will be able to select the template you want to use in new messages and replies/forwards at the bottom of the Signatures section.
Conclusion
If you’re on an Apple computer, you can create and edit a signature in Outlook Mac using the convenient process listed above. But while the Outlook Mac app allows creating an HTML-based signature in the signature box, the process can be complicated and may not necessarily produce consistent results.
That’s why it’s a good idea to use a comprehensive email signature management solution like Newoldstamp, which offers a range of beautiful templates, an easy-to-use signature generator, and the ability to quickly install a signature on your email client.
Get started with Newoldstamp today!


