How to Use Outlook to Skyrocket Your Productivity. The Best Tips and Tricks
Useful tools:
1. Newoldstamp - Email signature marketing
2. Mailchimp - Email builder and sender
3. Reply.io - Personal email outreach, calls, and tasks
4. RocketLink - Your branded short linker
5. Canva - Online tool for making designs
Managing your inbox sometimes could be a real struggle. Which is evidently affecting your productivity both at home and in the office. So, what is the best way to organize your emails to stay always tuned and avert all the distractions?
Here are some useful Outlook tips and tricks that will definitely improve your office administration and boost the productivity.
1. Learn keyboard shortcuts to use Outlook effectively
Like many other email services, Outlook has certain keyboard shortcuts that allow you to navigate through the program and ease your email communication. Here are the most common ones:
- Ctrl+R: reply to email
- Alt+W: forward email or switch to the weekly calendar view
- Shift+Ctrl+M: create a new email
- Ctrl+M: F9 to Send/Receive all
- Alt+S: Send email
- Ctrl+Q: mark selected email as read
- Ctrl+U: mark selected email unread
- Ctrl+F: forward email
- Shift+Ctrl+B: open the Address book
Once you remember these shortcuts, using Outlook will become more straightforward and save you a few minutes of scrolling down through the menu options.
2. Set desktop notifications only for important email
Notifications about every single email you get, can be super distracting. But at the same time, you don’t want to miss anything serious. It might be a good idea to adjust the Outlook settings to your needs and these are couple of simple steps to make it work:
- Go to File -> Options -> Mail Options
- Create a custom rule to receive notifications on emails from specific contacts.
3. Ignore conversations
At some point we all have our inboxes jammed with irrelevant conversations. Did you know they can be avoided easily? Select the email, then click Home -> Ignore -> Ignore Conversation. To restore an ignored email, go to the Deleted Items folder, then choose Ignore > Stop Ignoring Conversation.
4. Set up Outlook rules
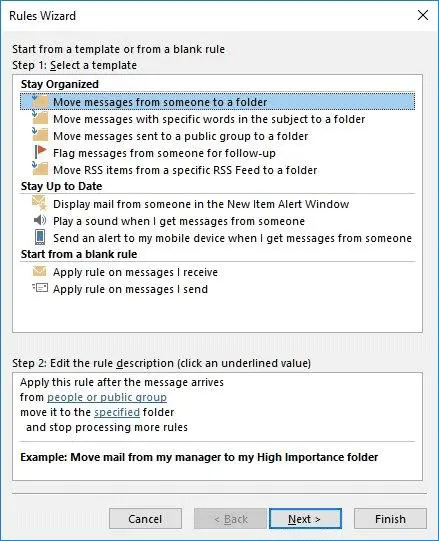
One of the best ways to organize emails in Outlook is by using rules. Designing them will help you to automate most of the manual actions to save a significant amount of time. Outlook rules are created with Rules Wizard, that has some handy templates and allows you to craft your own.
For instance, you could sort out your emails to a particular assigned folder.
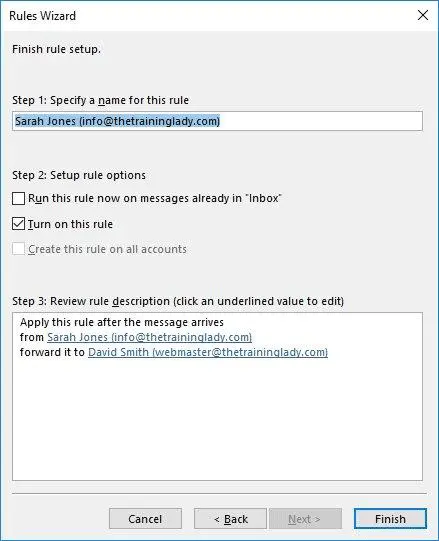
If you want to keep your business team updated, you can set the rule to automatically forward them the emails you want.
5. Clean up your inbox in one click
There is one simple but very practical function that instantly shorten the number of unnecessary emails. The clean-up button removes all the individual messages allowing you to read a clean original conversation. To clean up your inbox in a single moment, click on the “Clean Up” and select “Clean Up Folder”. Confirm the action in the pop-up window.
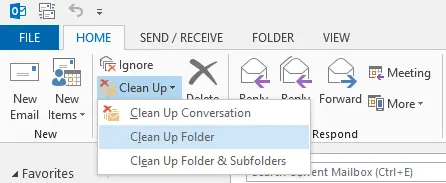
Such option is refined and completely safe, so you don’t have to worry about losing an important email.
6. Use quick parts to add frequent answer
Don’t type the same answer twice. Save your time and energy by generating “Quick Parts” to retain the text you use over and over again. Type the fragment you wish to add to the email, highlight it and within the Insert menu go to “Quick Parts” and select "Save Selection to Quick Part Gallery."

When it’s done, you need only couple of clicks to add that specific text to any of your emails.
7. Microsoft Outlook email signature
Add a nice final touch to your emails with a unique professional email signature. It reflects your brand identity and is a useful marketing tool for your business.
8. Tag mentioned people
To ease the communication and approach a specific person in a thread, use the @Mention function. Simply add the ‘@’ symbol combined with the first and the last name of a person and he/she will be notified about it.
9. Schedule an email for later
Whenever you need to send an email on a special occasion or simply prevent forgetting an important follow-up; Outlook helps you to schedule an email to send on a specific date and time. Click the Options tab, select the “Delay Delivery” option and set the task that suits you the most. This Outlook productivity tool will save your time and free your mind for the more important tasks.
It is crucial to know how to use Outlook efficiently to enhance the general productivity of the users. Outlook email management tips are aimed at making your office administration easier and more convenient. If Outlook is already your email client or you’re just starting to use it; you definitely have a chance to make it your favorite one.
10. Adjust attachments size limit
I’m sure all of you faced the issue of attachments’ size limit. You’ve been working hard on that sketch, but the email service provider doesn’t allow you to send it and you’re struggling for another hour trying to zip the file or reduce its measurements. Comparing to other email services, Outlook email attachments size limit is only 20MB of the attachments. But you can change the mail’s server default settings and adjust this number. Here are several simple steps:
- Go to ‘Start Menu’
- Type “regedit” in the Run Dialog box and press ‘Enter.'
- If you receive the ‘User Account Control’ notification, click ‘Yes’ button to proceed
- When the ‘Registry Editor’ window opens, click on ‘Preferences’ folder and select one of the following registry keys, depending on the Outlook version you use:
Outlook 2016:
Outlook 2013:
Outlook 2010:
Outlook 2007:
- After that, go to Edit -> New -> DWORD Value and name is as “MaximumAttachmentSize”.
- Double click on the value you have just created and under the ‘Value Data’ enter the attachment size limit you want. The number should be in KB, so here are some hints for you:
1048576 = 1 Gigabyte
102400 = 100 Megabytes
51200 = 50 Megabytes
1024 = 1 megabyte
It’s done! You’re good to go, but before that, there are some things you have to consider. Although you can modify the size limit of attachments, there is still could be a size limit set by your email server administrator or ISP. Hence, the only thing you can do is to split large files and send them using cloud services.
11. Create a folder for searches
The Search Folder is a useful feature not only to save all your unread emails in one place but also to set specific custom criteria. For instance, Outlook search folders allow you to collect all emails which contain the word ‘invoice,' are from a specific mailing list and have one attachment. It’s a great way to save some time, as search folders are automatically updated. It's easy; you have to find a ‘Folder' tab on the Ribbon and click on ‘Create New Search Folder.' In the opened window you can see some predefined folders that you can use if they suit your needs. Or you can create a custom one. Click ‘Ok,' and it's all set up!

12. Switch time zones
As the business communication develops, we often deal with international team meetings or even calls with a partner who lives on the other side of the planet. That’s why arranging your time zone settings is crucial for the company of any size. Outlook can help you to keep your events planning updated, no matter what time zone you’re in. It synchronizes the Calendar with a time zone on your laptop and updates the first one accordingly, so you don't have to worry about changing it manually or missing an important call/meeting.
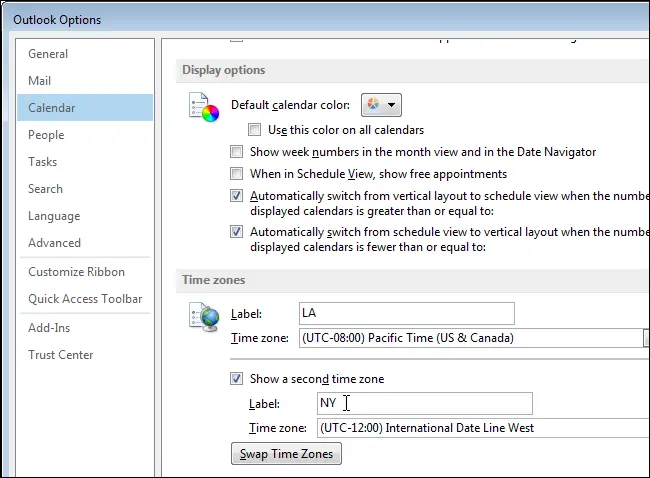
Another option how you can use a times setting in Outlook is to add a second time zone to your calendar, so an event displayed with two or even three different times. Here are simple steps how you can do that:
- Find ‘Options’ in your ‘File’ Tab menu.
- Select ‘Calendar’ from the sidebar, then go to ‘Time Zones’ section.
- Check ‘Show a second time zone’ and add a suitable option from the dropdown list. Click ‘Ok’ to save the changes.
13. Edit quick steps
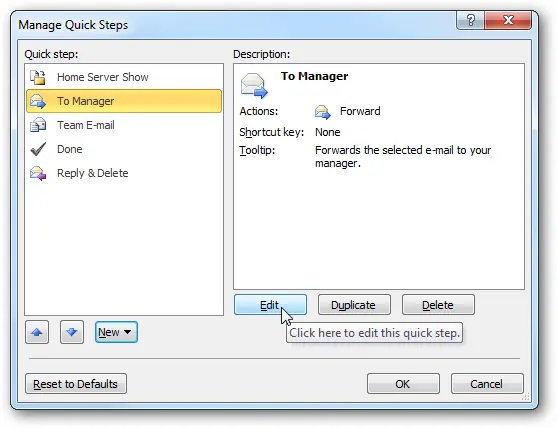
Outlook Quick Steps is a feature that allows you to take your multiple common actions simultaneously in just one click. How convenient it that? You can move emails between folders, forward them and create team emails. Start off by clicking on the Quick Steps box on the Ribbon and select ‘Manage Quick Steps.' In the open window, you'll see some default settings for the most common filters people use. Although, you can customize them according to your specific needs.
14. Use Outlook tasks
This feature is ideal for those who use to-do lists to keep track of their daily routine. Outlook tasks is an integrated function that allows you to interact with the list of tasks you have, set reminders, group them into categories, etc. Therefore, it’s a useful productivity tool that saves time and manages all your activities, personal and business ones. Here we want to show you how to create and some tips on how to handle them effectively.
- Go to your ‘Home' tab on the Ribbon. Click on ‘New Task.'
- In the open window set the task name, its start and end dates, the priority and, if you want a reminder.
- Save the task and close the window.
Now that you filled in your tasks list, you can modify and update them at any times.
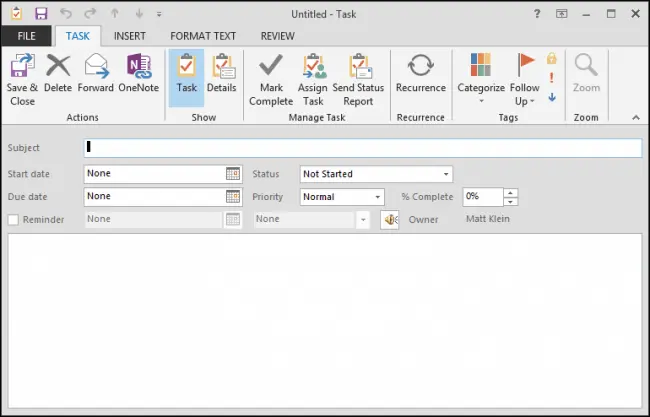
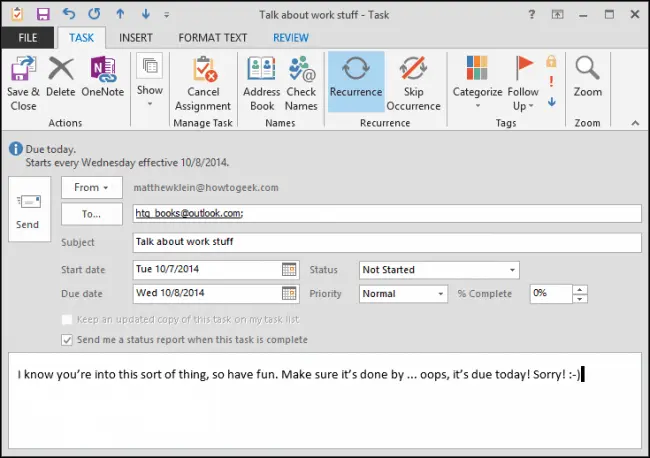
However, Outlook prepared some additional functions to make the use of Tasks more valuable. Tasks can be categorized and labeled to keep them tidy and structured. Select ‘Assign Task' at the top of navigation of the opened task to share it with your teammate. In the ‘Details' tab you can add ‘Total work' and ‘Actual work,' to track time; what is more, there are fields to specify billing information and company name, which is a useful element for freelancers. Another aspect of Outlook Tasks is that you can recur them to trigger the automatic update with a suitable pattern.
15. Set Outlook distribution lists
Distribution Lists are the list of recipients in your Outlook email that you can use to send one email simultaneously. The process of creating one is slightly different for different Outlook versions.
Outlook 2003 and Outlook 2007:
- Go to ‘File’ -> ‘New’ -> ‘Distribution List’.
- From the drop-down menu of the Address Book, select members you want to add. Create a name for the ‘Distribution List' and Save the changes.
Outlook 2010 and later versions:
- On the Home tab select ‘New Items’ -> More Items -> Contact Group.
- Click ‘Add Members and from your Address Book select all the contacts you want to be on the list. Name the group and save the changes.
When you send an email and want to add the distribution list to the recipients, just type its name. If you're going to add the distribution list you received from an email, right-click on the 'To' field and choose ‘Add to Outlook Contacts.' Distribution lists are an easy and efficient way to send out emails for a big group of recipients with much less effort.
16. Set up aliases inside Outlook
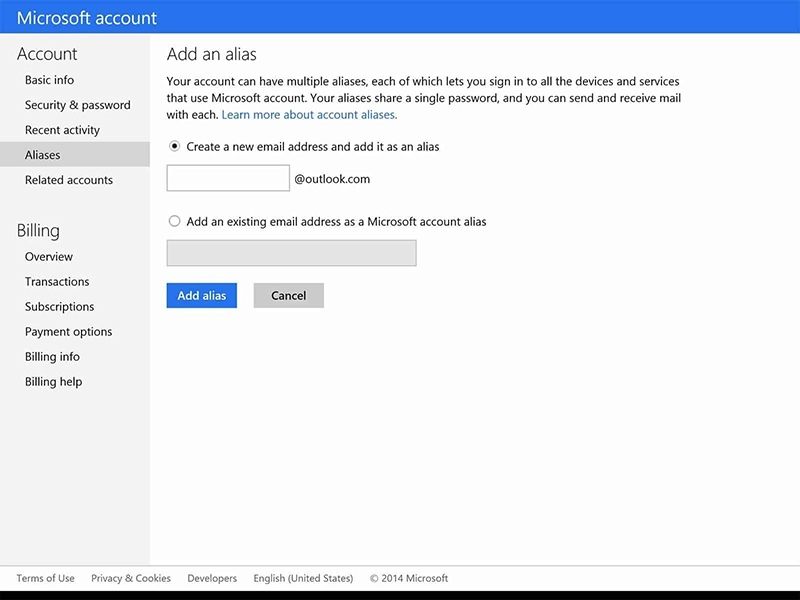
Did you know you can create multiple different email addresses and still receive letters to the same inbox? Outlook Aliases is an alternative email address which is linked to the existing one, and that may come in very practical for various reasons. In fact, you can create as many aliases as you want and still use them within the same Outlook email account. Here is why creating aliases could be so useful:
- Sort out your incoming emails, for instance, newsletters. They will go to a separate folder, and your main inbox will stay clean and easy to navigate.
- Create an alias for your online shopping, gaming, job hunting or forums that you like to read.
- If you want to change the name of your email address, but want to keep the contacts and letters, creating an alias might be the thing! And when you decide to stick with the new address, you can always delete the original one.
- Respond to different people with different email addresses. In that way, you can separate the formal emails and make use of a more professional email address alias.
Isn’t it great? Create an Outlook alias in two steps and get much more benefits:
- Go to the ‘Settings' icon and select ‘Options' and then ‘Create an Outlook.com alias.'
- Type in the name for your new address and click on ‘Create an alias.'
You can make up to 10 aliases for different purposes.
To sum up, Outlook could be a very convenient email service if you know how to use it properly. Although, many of the characteristics we featured in this article take a certain amount of time and effort to set up; in perspective it's only an investment in your productivity and perfectly structured email correspondence.


