
How to Create and Use Multiple Signatures in Gmail
In the age of instant messaging and social media, email remains a cornerstone of professional communication.
While a well-crafted email can leave a lasting impression, sometimes a one-size-fits-all signature doesn't quite cut it. This guide unlocks the secrets of creating and using multiple signatures in Gmail, allowing you to tailor your email persona to every situation with ease.
Why use multiple signatures in Gmail
An email signature is a digital business card adapted to the needs and demands of the modern world. You might have several jobs or wish to separate your personal and business correspondence, but that’s when you realize you need more than one email signature.
Imagine the possibilities:
- Send a signature with your professional info and portfolio link to clients, while a casual one with social media handles greets friends.
- Keep work and personal emails separate, ensuring clarity and avoiding confusion.
- Showcase your latest projects or experiences with a signature that subtly promotes your different initiatives.
.png?1705926989)
But wait, there's more! Studies show that targeted signatures with relevant links can increase click-through rates by up to 30%, boosting engagement and driving results. And forget the tedious task of typing your contact details repeatedly.
If you're looking for more details on creating sign-offs in Gmail, check out our comprehensive guide on how to add a signature in Gmail.
How to create multiple email signatures in Gmail
Discover how to effortlessly manage multiple signatures in Gmail with our one-minute guide, adding a personalized and professional touch to every email.
Create your signatures now
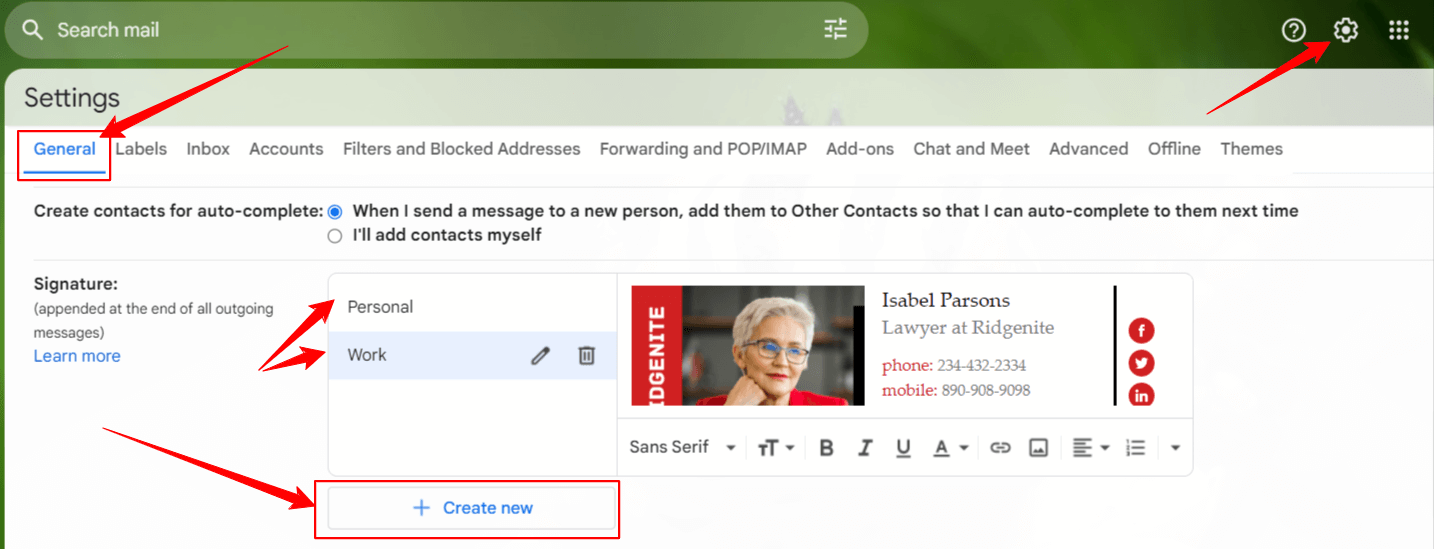
- Open Gmail and click the gear icon ⚙️ in the top right corner.
- Within the 'General' tab, locate the 'Signature' section.
- Click 'Create New' to craft as many additional email signatures as you need.
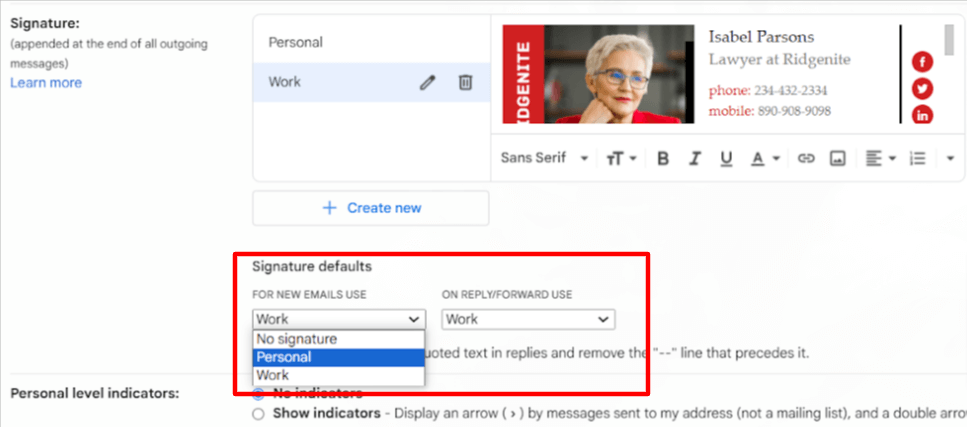
Set default signature
Streamline your workflow by setting default signatures for both new emails and replies. Choose the specific signature you want to set as default, ensuring it automatically appears when composing or replying to emails. Find this option within the 'Signature' settings.
Save your changes
Click the 'Save Changes' button at the bottom of the settings page to lock in your progress.
Switching signatures (when needed)
To use a different signature on a specific email, click the pen icon in the message box toolbar and select the preferred signature.
Pro tip: For an even smoother experience, try our Gmail signature generator to create professional-looking signatures in no time!
![]()
How to manage multiple signatures in Gmail
Effortlessly manage and personalize your email signatures in Gmail by following these simple steps. Whether you wish to set a default signature for new emails or customize each signature for individual messages, Gmail provides the flexibility you need.
Editing signatures: Personalize with a few clicks
- Open Gmail.
- Click on the top-right gear icon and select 'See all settings.'
- Scroll down to the 'General' section and locate 'Signature.'
- Choose the signature you want to edit.
- Make your desired changes in the text box.
- To modify the signature name, click 'Edit.'
- Finish by clicking 'Save Changes' at the bottom.
Adding images to your email signatures
- Access the 'Signature' section within Gmail settings.
- Click the 'Insert Image' icon.
- Choose 'Upload' to select an image file from your computer, or 'Web Address (URL)' if it's already hosted online.
- Position and resize the image to your preference within the signature area.
- Click 'Save Changes' at the bottom.
Read more: How to add an image to your Gmail signature
.png?1705927550)
Removing signatures: Keep it clean and simple
- Open Gmail.
- Click on the top-right ‘Settings’ icon and select 'See all settings.'
- Under 'General,' find 'Signature.'
- Select the signature you wish to remove.
- Click 'Delete' and confirm the action.
- Complete the process by clicking 'Save Changes' at the bottom.
Now, managing your various email signatures in Gmail is a breeze. Tailor your communication with ease, ensuring every outgoing message carries the right signature for the occasion.
Set up multiple Gmail signatures for different accounts using 'Send mail as'
Gmail's 'Send mail as' feature lets you manage multiple addresses like a pro. Take it a step further and craft unique signatures for each account!
Here's how to use different signatures for different accounts:
- Open signature settings. Navigate to ‘Settings’ >‘General’ > ‘Signature’.
- Select an email address from the drop-down menu above the 'Signature' box.
- Craft a signature that captures the essence of that address. Think professional for work outgoing messages, casual for personal ones, etc.
- Rinse and repeat - create custom email signatures for all your connected addresses.
Missing the drop-down menu? No worries!
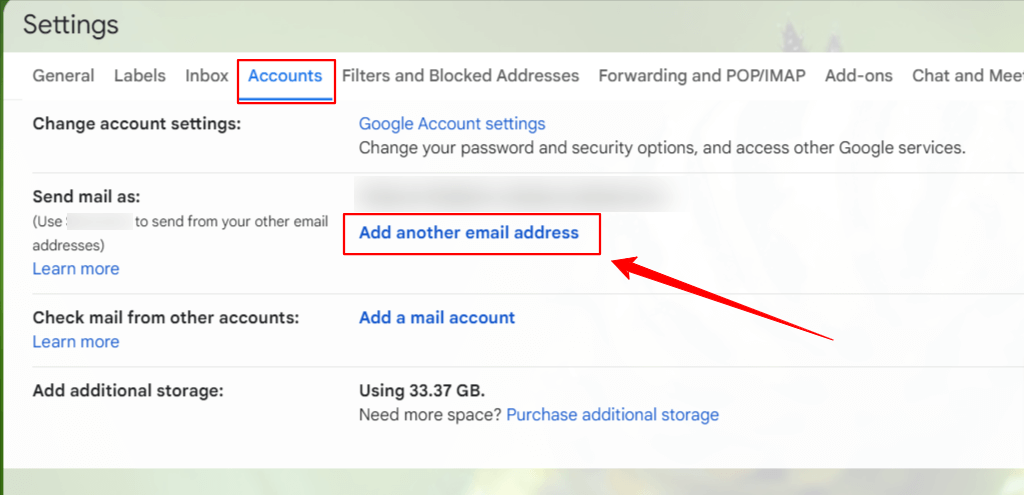
- Head to ‘Settings’.
- Click on 'Accounts and import' or the 'Accounts' tab.
- In the 'Send mail as' section, click 'Add another email address.'
- Enter your name and the email address you want to send from.
- Click 'Next Step' and then 'Send verification.'
- Click 'Add Account' to complete the process.
Make sure all your alternative email addresses are listed correctly in the 'Send Mail As' section.
Voila! Now, every email message you send carries a personalized touch, making your communication more impactful.
Bonus tip: Remember, a professional signature is concise, informative, and reflects your brand or personality. Keep it professional but don't be afraid to show your unique voice!
Alternative option: Use templates for multiple signatures in Gmail
An alternative option to add multiple signatures in Gmail is to leverage Gmail's Templates feature. This clever workaround allows you to save each signature as a template. You can absolutely rock your correspondence with this convenient option.
Note that this feature is available using Gmail on web browsers only.
Activate templates feature
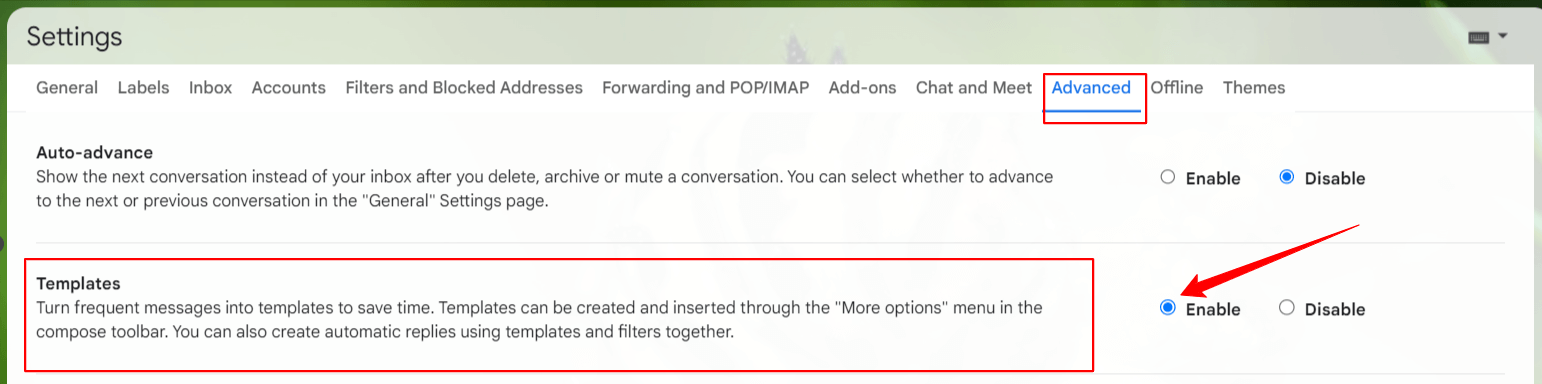
- Click the gear icon in the top right corner of your Gmail and select ‘Settings’ from the drop-down menu.
- Go to the 'Advanced' tab. For older interfaces, look for 'Templates' under 'Available Labs.'
- Enable the 'Templates' option and click 'Save Changes’ at the bottom of the window.
Set up email signatures as templates
Now you can set up an email signature as a ‘Template’. Following these simple steps, you can save as many signatures as you need.
- Create a new email, leaving the 'To' and 'Subject' fields blank.
- Design an email signature for your most frequent occasions with text, links, social icons, or banners.
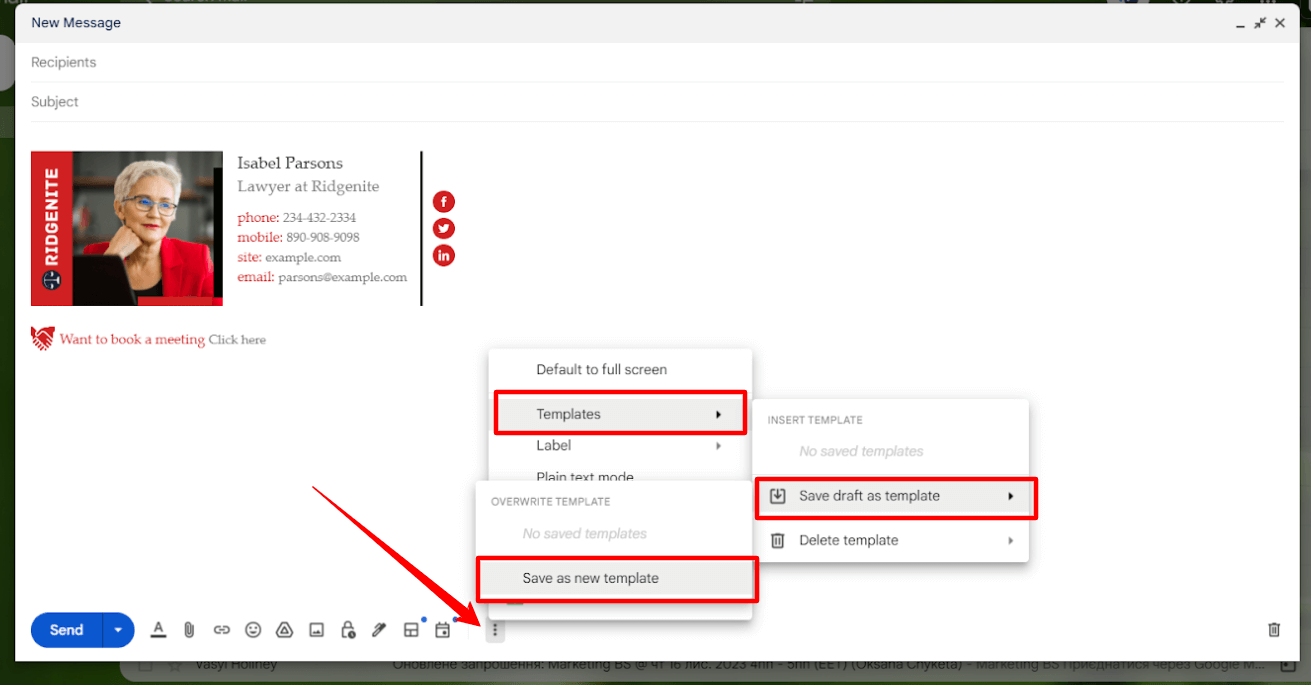
- At the bottom of the window, tap three dots, choose 'Templates,' then 'Save draft as template' and 'Save as new template’.
- In the pop-up window, choose a relevant name for your signature. Provide a descriptive name (e.g., 'Business Signature', or 'Personal Signature') and click 'Save.'
Using your signatures
That’s it, you’ve made it. So easy, right? You can design multiple signatures in Gmail in the same way.
- Compose a new email.
- Insert signature. Click the three dots at the bottom right corner of your new message window, select 'Templates,' and select a signature that suits your composed email the most.
.png?1705927941)
Efficient template management
Create templates for different purposes (business, personal, projects). Setting several templates in Gmail is very convenient if you frequently switch between multiple signatures. However, having one, in addition to your permanent email signature, may suffice.
Enhance signature design
Utilize online signature generators like Newoldstamp to create visually appealing signatures with clickable elements. Explore the advantages of clickable social icons, promotional banners, and creative designs to make your signature stand out.
What’s more, you can effortlessly copy a generated signature from the editor and paste it directly into your template.
.png?1705928085)
Note: Explore our free email signature editor for a simple yet visually appealing signature, and also discover email signature examples for inspiration.
Explore other ways to leverage Templates for saving entire email drafts or frequently used responses. This insightful tip not only enhances your email correspondence but also demonstrates how simple tweaks in Gmail functionality can boost your communication effortlessly. Gain that extra advantage with minimal effort!